Tuesday Project Roundup: Slow Pillows & Giant Pin Boards

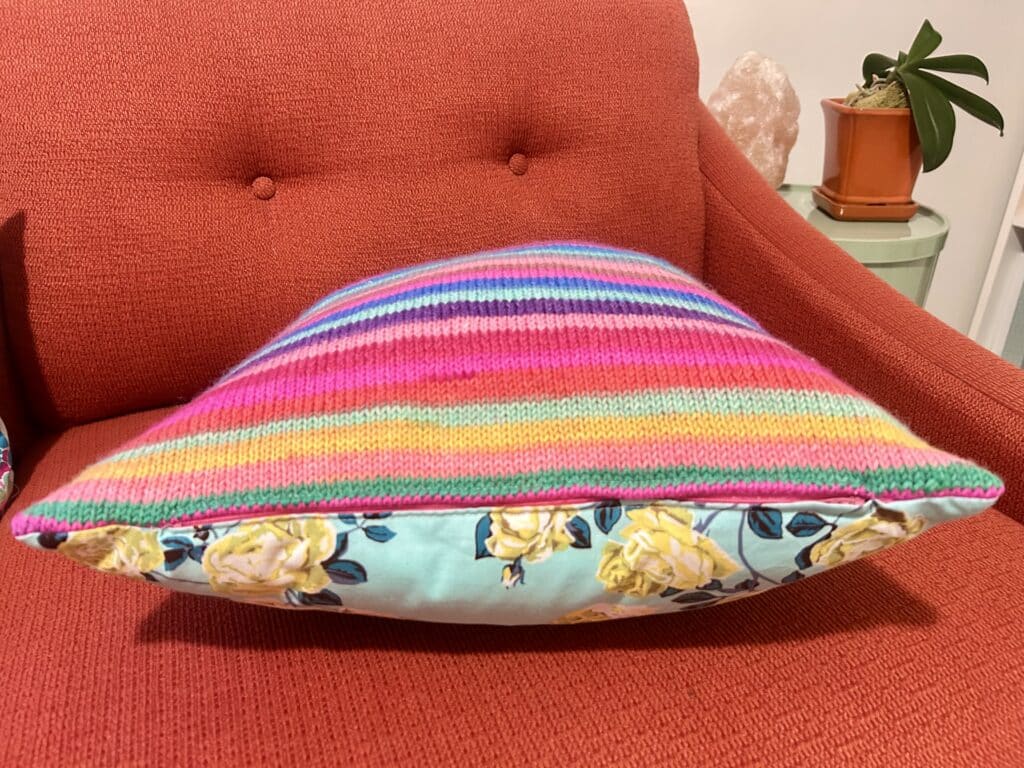
Right after I finished the rainbow stripe hot water bottle cover in 2024, I ordered another skein of that magic colorful yarn. I said in the bottle post that “I was leaving it out like another throw pillow” so I thought, “Why not just make a real throw pillow?” I did math for the cast on to get a 19-inch wide piece and then just kept knitting until it was 19 inches tall.

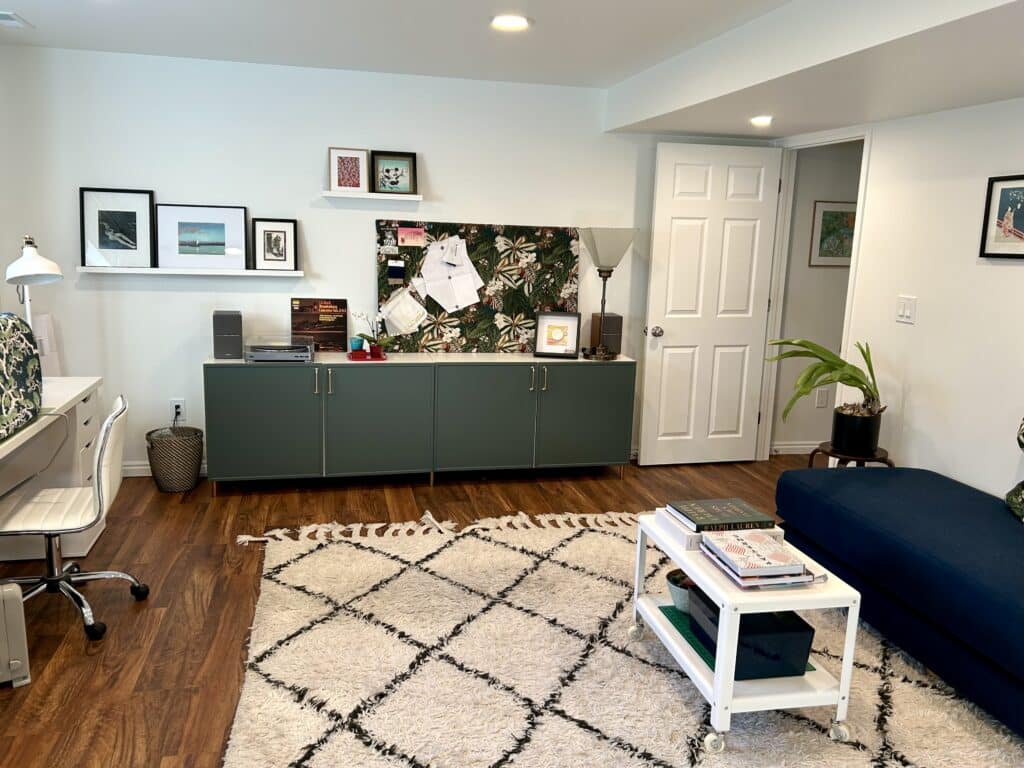
That knitting took, uh, two years…but that slowness worked out because those stripes look great in my new office! A corner of a white room with posters on the walls and a tall shelf displaying LEGO kits. An orange couch is in the foreground with a bright striped knit throw pillow on it.

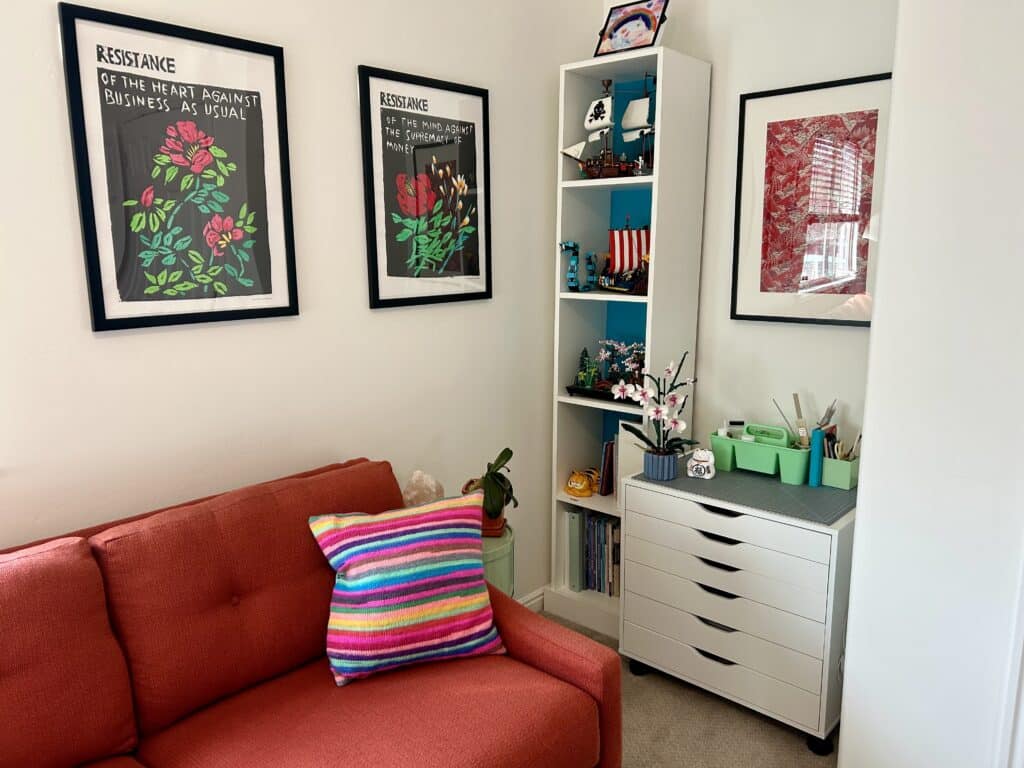
I blocked the knit square, lined it in scrap cotton, then treated that like one piece and sewed in a zipper. The backing of the pillow is an Anna Maria Horner reprint (I used the original in my first quilt back in 2009).
Closeup of the zipper at the bottom of a rainbow striped knit pillow.

This whole room is just a color circus and I love it. The giant pinboard on the other wall has a few postcards I put up in my locker in high school (!) on it and MOAR color from prints and posters. A desk with a large pinboard over it. The board is covered in bright posters and postcards.

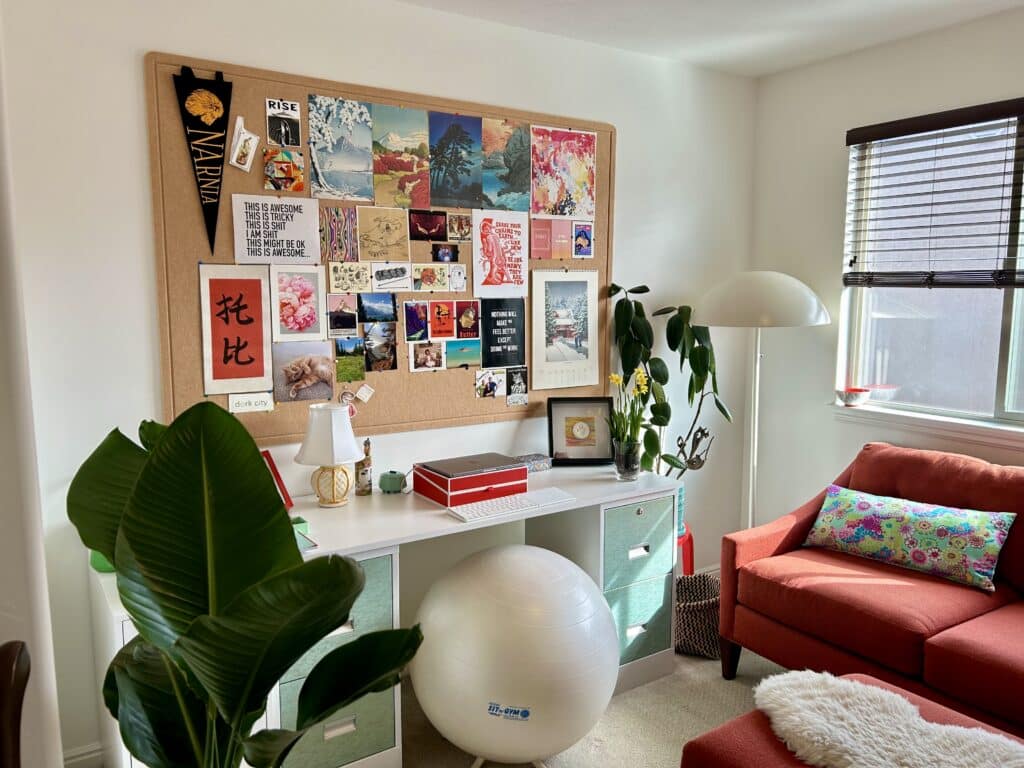
It’s kind of fun to have a room that’s just for me and not visitors or guests or Doc. You might be thinking, “Karen, you’ve decorated the entire HOUSE for you,” and you wouldn’t be technically wrong when I did the other rooms, I tried to keep visitors or guests or Doc in mind and think of what they’d like. This office is just what like and that’s rainbows and Legos and the lamp from my childhood bedroom and postcards like this: A vintage 80s photo of a woman on a patterned couch with wallpaper behind her. Text below the photo says, "When I looked at the wallpaper and the wallpaper looked at me we instantly fell in love"

Tuesday Project Roundup: A Paper Project

I pulled out the book board and papers and made a tissue box cover for the new bathroom over the weekend:
a paper covered square tissue box cover. The paper has botanical-illustration style oranges and leaves on it in rows.

It had been a while since I worked with the thinner Italian papers vs. the forgiving Japanese ones but we made it work. And we have some nice pops of orange in there now:
A green bathroom vanity with the tissue box cover and a piece of orange art glass on it.

And! We finally got shower glass last week, so everything is DONE-done now:
A tiled shower with a black stool in it and a solid glass door

Decorating Instead Of Sewing

I’ve been hanging pictures and drilling cabinets for hardware instead of sewing (or even knitting) but the new Luxury Sewing Lair in the basement is all set up!

This is what you see when you walk in. I need to make machine covers (the fabric is just draped here) and I’m waiting for a tabletop ironing board to arrive to go on that far left desk. (My regular ironing board is huge and I don’t need it unless I’m ironing lengths of fabric, so that’s going to stay in the closet.)
Three long white desks against a wall with two curtained windows in it. The desks have three sewing machines on them.

On the other side of the room, we have the thing that gave me the idea to finish the basement in the first place: I wanted a guest room. Sure, I ended up making a Luxury Sewing Lair instead but I still wanted the ability to turn this into a space for guests. So there’s an ensuite bathroom down here and that blue chaise opens like a book into a queen bed. (Still need to make some throw pillow covers.)
A navy blue chaise lounge with a white coffee table on wheels in front of it. There is a fluffy white rug on the floor.

And on the far end of the room, there’s fabric storage and the record player. I’m debating adding a TV over there, too, but the decorating budget is maxed out for a while.
Long green cabinet pushed against a white wall. There is art and a fabric covered pinboard on the wall in green and blue print.

I love this space, though. Other than the chaise and the doors to the cabinets, I had all the other furniture pieces; they just got shuffled around the house. I can wheel the little coffee table out of the way and cut stuff out on a nice thick rug and generally luxuriate in a room I dreamed about when I bought the house 15 years ago.

Tuesday Project Roundup: Decorating For Free

It’s either the season or the fact I want some things in my life to CHANGE, but I’ve had redecorating on my mind lately. The living room suddenly didn’t  work for me–too full of furniture, the coffee table wasn’t right, we need more bird feeders. I decided a new chair and a cocktail ottoman would fix things up…and remembered that we’ve had a lot of medical bills lately, both feline and human.

Then I saw this image from Reath Design of a coffee table with a tablecloth on it:

And realized I could cover things in fabric for FREE. I even had fabric in storage for it–the original curtain panel I made for the space eleven years ago. (Never throw anything away!) It was even the perfect lengthwise size, so I only had to cut about 30 inches off one end.

I hemmed it up, rotated the coffee table 90 degrees, and took the ottoman for the Eames lounger upstairs to open up some space. And blammo! “New” room for zero dollars.

And it’s Toby approved, of course–he’s always going to approve a fabric covered surface:

Never Enough Pattern

After eleven years in the house with stark white walls and orange accents, I’m moving towards patterns and greens–first in the bedroom, then in the bathroom, and now in the living room:

The before: (so stark!)

This was my second time hanging self-adhesive wallpaper and having some experience from the bedroom wallpaper helped a lot. I think it only took a couple hours of hanging time, plus trimming the edges and patching around one outlet (oops, good thing it’s hidden).

I love the print–it’s giving me Bloomsbury-meets-midcentury vibes. I bought it from the brilliantly-named Etsy shop WallHalla and…it had been sitting in the basement for three months, waiting for me to hang it. (Winter was tough.) So it feels good to have it up.


Tuesday Project Roundup: Recovering Chairs, Saving Money

I really want a new dining set but I just bought a couch and need to buy some wallpaper (and a single-level house without an HOA in the mid-future). So saving money with DIY skills was in order. First up, replacing the split cane and worn out foam on the old chairs:

I went back and forth a lot on vinyl types to replace the cane with but finally settled on a bright green (from Fabric.com–I only needed a yard for four seats). Once I figured out I could just pull the vinyl around the seat corners and didn’t need to make folds, it went quickly.

The hardest part was getting the staples out of the old cane–honestly, it was easier to pull staples out of the bathroom subfloor than these chair seats. 

These still aren’t the most comfortable chairs but the new foam (from JoAnn, in store) helps a lot–and they’ll work for now.

Next up, I’m making skirted tablecloth made to cover the (thrifted IKEA, dinged up and dirty) dining table completely:

(Will Toby ever get off a fabric-covered table? Will we be creating a tablecloth Fort Kickass for him to play in constantly? Stay tuned.)

Tuesday Project Roundup: New Couch, New Pillows

I’ve made my own pillow covers before, but I always got lazy and just did an envelope back–then got annoyed when the cover didn’t ever fit snugly. This time around, I took the time to put in a zip. I even added piping! And I can’t believe I hadn’t been doing that all along. It’s not that much extra work and it looks so professional:

When I was starting to plan all of this redecorating I went to a local warehouse for decorators’ fabric and saw that serape-ish stripe. I went back the next weekend and bought it, then realized it went really well with the leftover blocks from my quilt coat. (Wow, is it a lot faster to quilt just a pillow front and back than a whole long jacket.)

My other tip for nice plump pillows, other than adding a zipper? Make them 1-2 inches smaller all around than the size of your insert. The inserts here were 18×18 but pretty squishy, so I went with a 16×16 final cover size and it worked out perfectly.

How To Hang Removable Wallpaper

Step 1: Figure out how you want the pattern to be split up on the wall. (We decided to center a full repeat in the middle of the wall.)

Step 2: Drop a plumb line on both sides of where your first roll will go. Tell your partner that “plumbus” is Latin for “lead” because that’s what the weight at the end of the line was back in the day. Realize that’s where “plumbing” comes from, too.

Step 3: Hang your first roll following your guide lines, then keep hanging rolls, following your first one that’s perfectly aligned. Say goodbye to the weird coral accent color that never really worked.

Step 4: Make sure you have lots of helpers. One of your helpers may bring their helper (Pink Mousie) over to see what’s going on.

Step 5: Removable wallpaper is pretty forgiving, so if you find your ceiling isn’t perfectly level, thus making your vertical lines get off slightly by the end of the wall (something you didn’t consider as you were pondering “plumbus”), you can peel it up and smooth it back down repeatedly to fudge the pattern match.

Step 6: Trim off the extra paper at the corners and bottom using a sharp blade and a ruler, put everything back, and ask your partner, “Do we live in a magazine now??? We DO.”

Hanging removable wallpaper is VERY doable. I would say it’s easier than painting–it’s definitely less mess and cleanup and far easier (for me) to get a nice sharp edge. We got our wallpaper from this Etsy store but you can find it lots of places, including Target.

New Bathroom!

Sometimes when you start a project like a cosmetic remodel of your bathroom, you feel guilty. Because your house is less than five years old and the builders grade finishes are perfectly acceptable. Because you made your dad work for free doing hard labor on his hands and knees. Because maybe you’re just a spoiled princess who fixates on little things like bathroom aesthetics instead of just being grateful for two bathrooms.

Well, put a pea under my mattress and thank my dad over and over, because the guest bathroom remodel is done and it makes me so happy, I forgot about the guilt.

Here are the finishes before: IMG_7276

And here it is after:
IMG_7304


Dad took out the existing vanity and put in a new wood-look porcelain tile floor. I re-stained the vanity as per Pinterest, then we put it back in and put on a new top and faucet from Lowes.
IMG_7267


THEN he put in a marble and glass backsplash, which really just makes the whole room sing. (Seriously. And check out the line of tiny tiles on the bottom left he had to cut, to compensate for the dip in the sink and make the top tile line stay even!)
IMG_7273


I don’t even hate my staining job on the vanity any more, although it pales in comparison to the tile work.

IMG_7272


Most importantly, the princess’s cat also approves of the whole remodel.

IMG_7264

It looks so good. This bathroom is at the top of the stairs, so every time I go upstairs I get to see it and smile.  Thanks again, Dad!


Tuesday Project Roundup: New Pillows

I made some new pillows for the new year in the living room. The old pillows were a chevron pattern and I just wasn’t feeling the blue or the pattern any more (see a glimpse here). I had some fern green cotton velvet hanging around, so these were both fast and free.

IMG_5756

I know that green and orange can veer into “the 70s” for some people, but to me it always looks fresh and vibrant. Just look at any nasturtium, trumpet vine, or tiger lily.